
SMM Provider lists
We offer some smm provider for your panel if you want to resell.
1. STAR SMM PANELS
2. Great SMM Panel
Requirements
Before installing SmartPanel, please make sure following PHP requirements and extensions are installed and enabled on your server:
| Server | Apache/Nginx |
| PHP version | PHP version 5.6 ~ 7.1 |
| allow_url_fopen | allow_url_fopen=On (php.ini file) |
| PHP cURL | Required. (Curl Library, Curl_init Function and Curl_exec) |
| PHP OpenSSL | Required. (For secure data encryption.) |
| PHP PDO | Required. (To create secure connection to MySQL server) |
| Cronjobs | Required (The cronjobs must be configured for publising scheduled posts.) |
| Zip | PHP zip extension is required (for updating, installing etc) |
| PHP CURL | PHP CURL extension is required |
| Mod Rewrite Enabled | Required |
| Mbstring PHP Extension | Required |
How to Install
Step-by-step guides to set up this script on your web application. Please read the following guide carefully.
- Step 1 – Upload and Extract a Zip ArchiveUpload the installed zip archive to your web hosting. And then extract all files
- Step 2 – Go to installation pageOpen your browser and go to installation page. (In this case, this is
www.yourdomain.com) - Step 3 – Fill out all the requested informations.After redirecting to installation page, you have to fill the form with all the requested informations (database name, purchase code, admin account details…etc)
- Step 4 – Finish InstallationClick Finish Button after filling all the requested informations on the step 3. You will see successfully message after few seconds, if everything is exactly.
How to video
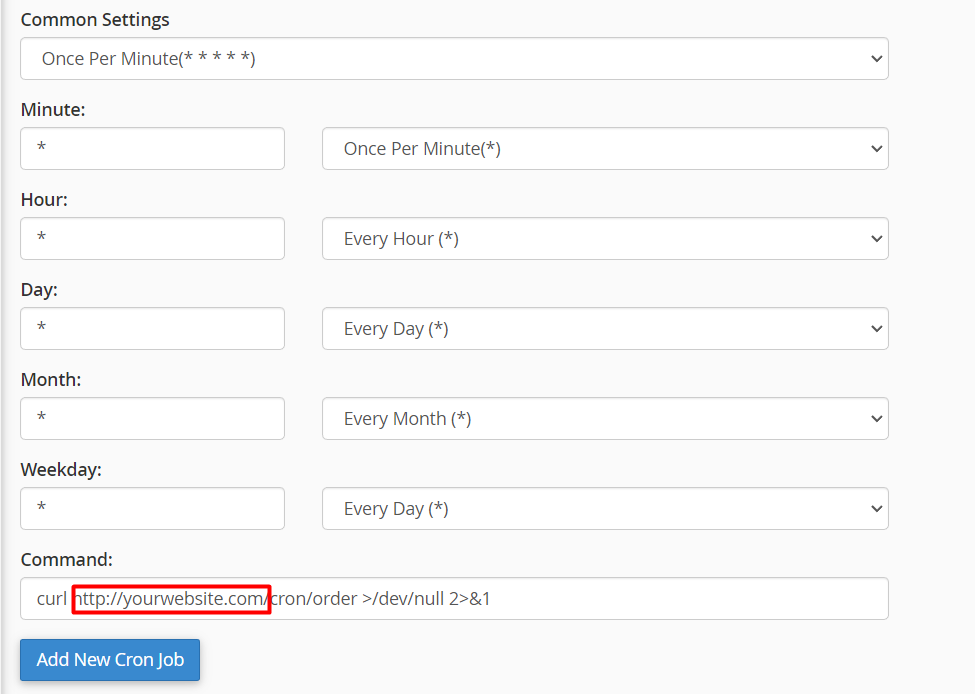
How to add cronjobs
To be able to send order, order status. Cron task must be configured on your hosting. In cpanel, you should click Cron task and fill this command at the command filed:
Cronjob for main Smartpanel script:
* * * * * wget --spider -O - http://yourwebsite.com/api_provider/cron/order >/dev/null 2>&1* * * * * wget --spider -O - http://yourwebsite.com/api_provider/cron/status >/dev/null 2>&1* * * * * wget --spider -O - http://yourwebsite.com/api_provider/cron/status_subscriptions >/dev/null 2>&1
Cronjob for Coinpayments payement gateway module:
* * * * * wget --spider -O - http://yourwebsite.com/add_funds/coinpayments/cron >/dev/null 2>&1
Cronjob for CoinBase payement gateway module:
* * * * * wget --spider -O - http://yourwebsite.com/coinbase/cron >/dev/null 2>&1
- If your hosting doesn’t support cron task, you should consider to migrate to another hosting or use crontask from the third services. (For example:
wwww.easycron.com) - You have to replace
http://yourwebsite.com/to your domain. Fox example if you’ve installed the script towww.example.com, In this case, cron URL will bewww.example.com/api_provider/cron/status
How to video
Add category
Admin Panel is completely dynamic, so you can add/update categories.
Guide Steps:
- Log into admin, Go to Category
- Click add new.
- Write Name of Category, description and Status which is active by default, choose sort number etc
- When you want to deactivate Service, just make status deactive.
- Click Save button
Add Service
Admin Panel is completely dynamic, so you can add/update services.
Guide Steps:
- Log into admin, Go to Service
- Click add new.
- Write Name of Service, description and Status which is active by default, choose sort number etc
- Price Per Single item. Ex: price for 1 Like = 0.01 etc
- Minimum quantity – Ex: 100
- Maximum quantity – Ex: 3000
- Click Save button
Place Mass Order
Any User can place orders in bulk (Mass Orders)
Guide Steps:
- Log into user, Go to Order/New Order
- Click Mass order tab
- Write order in each new line with the given format: service_id|link|id
- Click Place Order button
Paypal Integration
To enable PayPal, you just need to create PayPal API Client ID and Client Secret.
How to video
Stripe Integration
Once testing is done and the payment process working properly, follow the below steps to make Stripe payment gateway live.
Guide Steps:
- Login to your Stripe account and navigate to the API page.
- Collect the API keys (Publishable key and Secret key) from Live Data.
- Copy and paste all Publishable, Private Key to Setting page
- Click Save button
Paytm Integration
To enable Paytm, you just need have Paytm Merchant ID and Paytm merchant key. follow the below steps to make Stripe payment gateway live.
Guide Steps:
- Login to your Paytm account and navigate to the API page.
- Collect the Paytm Merchant ID and Paytm merchant key from Product mode (not is test mode).
- Copy and paste all Paytm Merchant ID and Paytm merchant key to Setting page
- Click Save button
2Checkout Integration
To enable 2Checkout, you just need to create 2Checkout account
Guide Steps:
- Login to your 2Checkout account and go to the API page.
- Generate API keys and switch to the Settings tab. From the Key Generator section, collect the Publishable key and Private key.
- Copy and paste all Publishable, Private Key to Setting page
- Click Save button
Coinpayments Integration #back to top
To enable Coinpayments, you just need to create Coinpayments account
Guide Steps:
- Login to your Coinpayments account
- Go to: ACCOUNT -> API KEYS.

- Use the API Key that’s already there, or generate a new key by clicking the “GENERATE NEW KEY” button
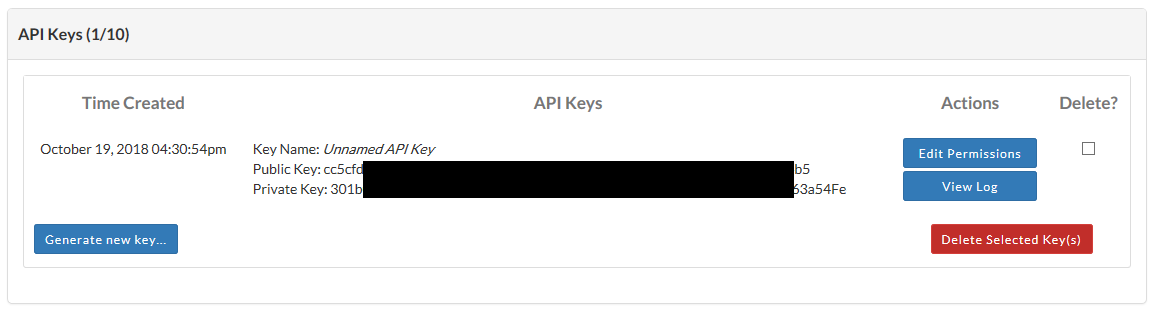
- Save your API Public Key and your API Private Key
- Copy and paste all API Public Key and your API Private Key to Setting page
- Click Save button
- Add more cronjob for Coinpayments module:
* * * * * wget --spider -O - http://yourwebsite.com/add_funds/coinpayments/cron >/dev/null 2>&1
Google reCAPCHA #back to top
To enable reCAPTCHA, you’ll need a Google account. This Form Block integration uses reCAPTCHA V2, follow these steps to get necessary keys
Guide Steps:Go to Google reCAPTCHA website https://www.google.com/recaptcha/admin and find “Register a new site” section
Include any text in the “Label” field.
Select “reCAPTCHA v2” (Check Box) type
Enter your built-in domain and click the + icon. Repeat this process with any custom domains connected to your site. Use the formats yoursite.com, excluding https:// from the beginning. 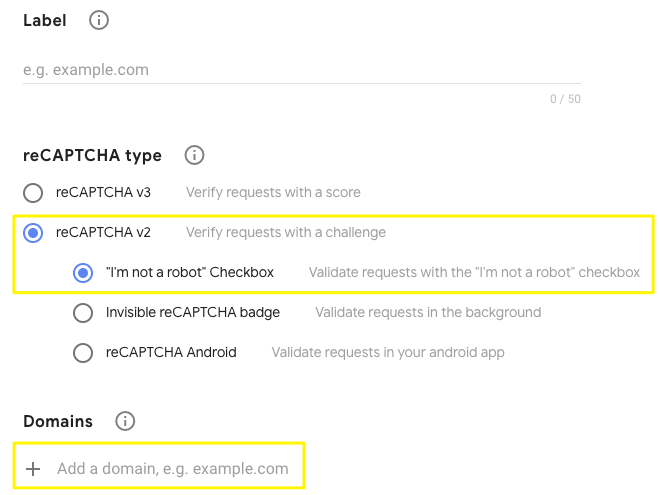
Click Submit.
Copy & paste the site and secret keys to Setting page in your app 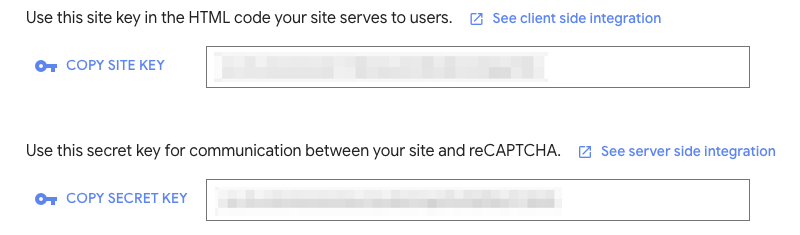
FAQ – Frequently Asked Questions
Comming soon